
-
This is a basic question about VC++ Project Configuration.
I have a Solution called X, and two projects under it, Utility & Element. Project Element is dependent on Utility.
I want to set up the project configuration such that I do not have to move/copy any output files (post-event script) after each build. And I'd like to run by hitting F5 after each build. So I am putting all .dlls & .libs under ...\X\Debug\ folder.
Project Utility builds fine and Utility.lib & Utility.dll are created at the folder I specified. But when I build Element, I am getting "cannot open .... Utility.lib"
link error. The linker is searching the folder where "..\Utility" is prefixed to the path I specified in "Additional Library Directories". I do not know why....Here is my setup for both Utility & Element projects:
Configuration Properties->General->Output Directory $(SolutionDir)$(ConfigurationName)
Configuration Properties->General->Intermediate Directory $(ConfigurationName)
Configuration Properties->Linker->General->Output File $(OutDir)\$(ProjectName).dll
Configuration Properties->Linker->General->Additional Library Directories $(OutDir)
Configuration Properties->Linker->Input->Additional Dependencies <NONE>
Configuration Properties->Linker->Advanced->Import Library ..\$(ProjectName)\$(ConfigurationName)\$(ProjectName).lib
|
|
Visual Studio 2008 Porting Notes Last Update: 2011-May-28 C# / WPF Implementation ======================================================================================== History This CAD program was primarily developed in VC++6.0 on my desktop. My current desktop PC (several years old) is running Windows XP. I have VC++6.0 on it. I also have a new (9-month old) Sony Vaio laptop PC (Centrino, 6GB RAM, 512MB VRAM) running Windows 7. I installed Visual Studio 2008 Professional on both Windows 7 and Windows XP. Several months ago I tried to port my CAD program to VS2008 (VC++2008) but I encountered a lot of issues.... Finally I built my program on VC++2008, but it hit an assertion and died.... somewhere in the creation of MainFrame, so I gave up.... That meant I could only build on VC++6.0. I wanted to continue my development on Sony, so I tried installing VC++6.0 on my Sony, but I hit a snug: VC++6.0 did not install on Windows 7 - due to some known problem from MS. So I was left with only my desktop XP to build my CAD using VC++6.0. Once built, G.exe did run OK on my Sony (Windows 7). Now, on September 1, 2010, I decided to try again.... I wanted to have a good build environment on this Sony laptop, and really wanted to move away from old VC++6.0. The objective is to move completely to VS2008 (and VS2010) - to achieve a clean build on VC++2008 and get rid of VC++6.0 dependency. I assume a move to VS2010 is easy once I move to VS2008, since they are so close in terms of their release dates. This time, I finally - finally - succeeded in porting my CAD to VS2008 world. I was able to get a clean build of my CAD exe on VC++2008 (on Sony/Windows 7) and it ran OK, no assert failure/Abend. Finally, I do not need my good-old VC++6.0 anymore! In the month of September, 2010, I achieved the following: 1. Visual Studio 2008
- Successfully ported the entire program to VC++2008 environment (no more
dependency to VC++ 6.0). Solution Setup in Visual Studio 2008
Visual Studio uses Solutions and Projects to organize all the files necessary
to build an application How to make a project (solution)
1. In VS2008, File -> New -> Project will make a boilerplate project.
A new solution is automatically created to hold the project. ======================================================================== Incremental Linker Error - internal error Known problem (hot fix exists). This error is a serious problem for VS2008 - VS2010 fixed this problem. How to avoid errors....
1. Bring up VS2008 by double-clicking a project file (xxx.vcproj).
My best remedy
for this VS2008 incr link problem is to disable this feature for all my
projects: How to Disable Incremental Linking
1. R-click Project node from Solution Explorer, and select Properties. My Old Way to Build --- No More! Right after porting to VS2008 (from VC++6.0), I had 12 solutions (one project per solution) and I had to do the following to build the entire build --- I do not do this anymore because VC2008 Solution will take care of dependencies automatically...
1. Bring up VC++2008 by double-clicking PPP.vcproj file. ======================================================================== How to build a solution (all projects under it) Visual Studio 2008 Solution will maintain "dependency" of projects...
1. Whenever these is a change in Project's *.h include files, you must
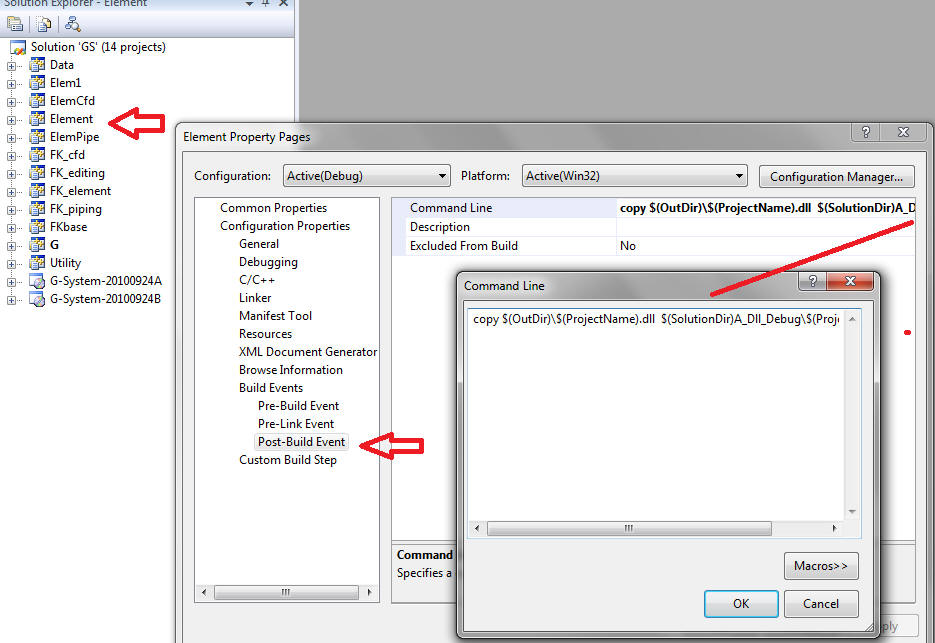
copy them to A_Include folder. How to copy *dll after each project build automatically Set project properties to copy the DLL automatically to A_Dll folder.
1. R-click Project node from Solution Explorer, and select Properties. How to run the program After a successful build above, you can run the program as follows:
1. Copy all *.dll files from A_DLL_Debug or A_DLL_Release, depending on
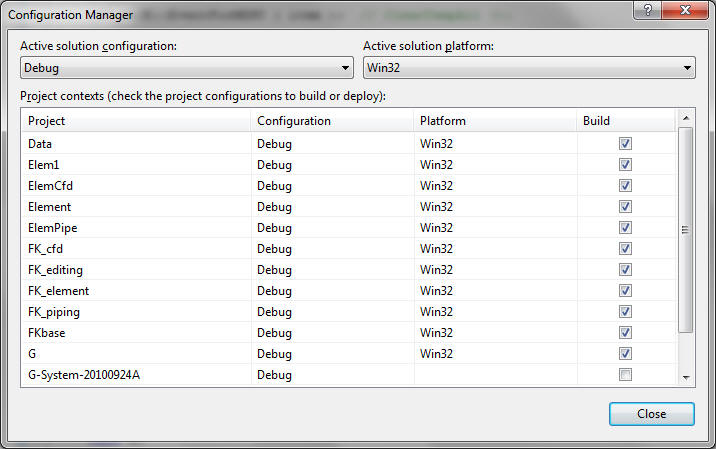
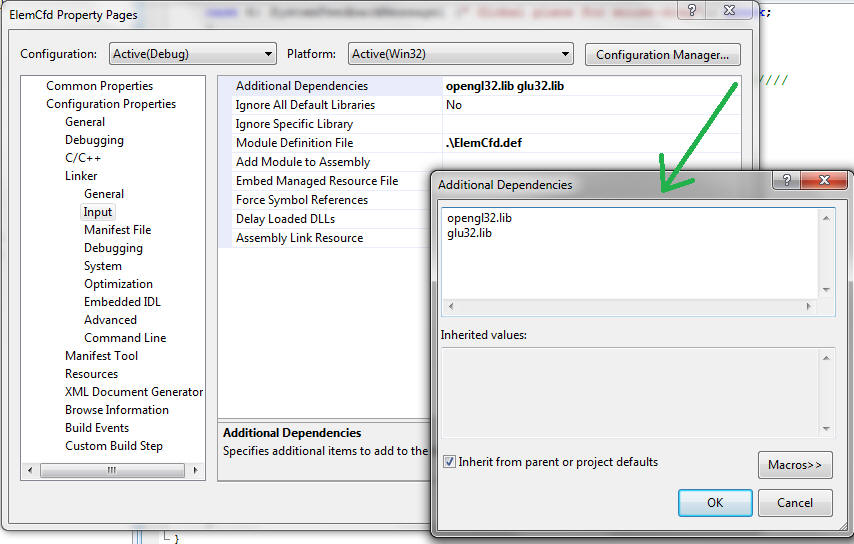
which you built, onto G/Debug or G/Release folder. How to make a RELEASE build Make sure to add opengl32.lib & glu32.lib as Additional Dependencies for Linker Input
1. VS2008 - Click Build->Configuration Manager. Set Active solution
configuration to Release. Then click Close. ======================================================================== VS2008 Project File --- ***.vcproj Project FileTempering Using Notepad Background: As a result of
converting my VC++6.0 projects into VC++2008, my *.vcproj files (of all
projects) have been badly
corrupted - Yes, VS2008 is the culprit. This happened during the updating
process from *.dsw to *.vcproj by VC++2008. My project dependencies were
affected. I experienced many strange dependency issues between debug and release
builds also. I could not resolve this problem interactively using VS2008 GUI. So
I had to resort to tempering *.vcproj files manually - the *.vcproj file is a
text file written in XML and can be edited by Notepad. This manual change I made to *.vcproj (using Notepad) has been reflected in VS2008's Solution Explorer pane (as .lib dependencies under each project node). I also changed my solution properties from VS2008: Solution Property Pages - Project Dependencies. For one of my projects, I clicked (added) a new dependent project (Depends on:). This added the new dependent lib in Solution Explorer view, and automatically modified *.vcproj file - VS2008 used exactly the same syntax as I did (see above), so I felt totally exonerated!!!! Now, instead of adding, I unclicked one project as dependent (Depends on:). This did not change Solution Explorer view. I wonder if this is a software bug..... I then removed this entry (lib) from Solution Explorer by R-clicking Remove. Only after have I done so, the corresponding line from this project's vcproj file was deleted. ======================================================================== Deployment - Windows Installer (VS2008) ClickOnce is not available for Windows applications, so I used VS2008 Windows Installer here... First, select the "debug"
configuration and Build-->Clean Solution. Do the same for "release". Then on
"release" click Build-->Build Solution. 1. To add a setup project
to an existing solution --- ---------- Some Notes After step 9 above .... As noted above, if I have all DLLs copied into G\release\ folder, I get duplicate DLLs packaged in my setup... So I thought, if this is a case, I only need to select Primary Output from G, and I do not need to select all Primary Output from individual projects (since I caopied all DLLs under G\release). I tried this scenario to make a setup.msi. However, this did not work and I got an "ElemPipe.dll missing" run time error... So, selecting Primary Output for all DLL projects are needed (just make sure to delete all DLLs from G\release folder to avoid duplicates). ========================================================================
List of Modifications
======================================================================== Warnings - Remove them all!!!! If left, runtime detects this and pop panels!!!
-------- GDate.cpp - ln 2072 pE = NULL; Element - GElem.cpp dumValue = 0.0; (3 places) Elem1 -GElem1.cpp in for loop - Add "int" as in for (int i; ...) (3 places) ElemCfd - GElemCfd.cpp - ln 5131 - return m; G - GView.cpp - ln 1123 if (test) // = true ======================================================================== UINT VS. CSTRING G - GView.cpp OLD: keyCString += nChar; NEW: keyCString += TCHAR (nChar); ======================================================================== Icon for this application G - int CMainFrame::OnCreate Somehow, this was failing after porting to VC++2008, so I just skipped this code. This simply disabled the display of the Application Icon... no big deal. /////////////////////////////
Load Icon for mainwindow ======================================================================== Visual Studio 2008 - Build Configuration This must be done for each and
every configuration: 32-bit Debug/Release & 64-bit Debug/Release. VS2008 Project Configuration / NEW : 2012-Feb-29 Visual Studio 2008 Project Properties has been changed to forgo "Post Build Event".
1. Include files do not need to be copied to A_Include folder any more,
after any Include file change in any Project. Because... see 2 below. VS2008 Project Configuration : 2012-April-03
|