|
Resolution
Back to Notes on Photography The sharpness of the final photographic image is mainly determined by the resolution of the lens and the film used. In digital photography, the digital sensor is the film. Your lens may form a sharp image on the focal plane, but if the film is incapable of capturing it, we do not have a good image. And vice versa. They have to go hand-in-hand. Both the lens and film must be comparably good, else the lesser performing becomes the bottleneck. In today's world of digital photography, the lens tends to perform much better than the digital sensor. That is, the film is limiting in the overall resolution calculation. Any improvement on the sensor resolution, therefore, is likely to have a direct impact on your final photograph. With the 24 MP digital sensor for a full-frame (35mm) camera, we have just arrived at the same film resolution of Fijichrome Velvia (80 lp/mm). The 50 MP sensor is a little better. The digital sensor must go further --- to 500-1000 MP in the full-frame 35 mm format to be "on par" with the current lens resolution.
Optical resolution is the ability to resolve detail. The resolution is defined in terms of "line pairs per millimeter", or lp/mm for short. We are interested in determining how many lines are discernable in the distance of 1 mm. One line pair consists of a black line and the adjacent white line of the equal thickness. The higher the lens resolution, the greater the number of lines you can resolve. You need a film to capture the image created by the lens. The higher the film resolution, the more you can capture on the film. The final resolution of the resultant picture that you see is the accumulative effect of the lens resolution, the film resolution, and the resolution of other optical/non-optical systems involved in the entire imaging process. This overall resolution, sometimes referred to as the system resolution, is given by the following approximation.
1 where Rl is the lens resolution and Rf is the film resolution. For instance, if your lens resolution is 100 lp/mm and the film resolution is also 100 lp/mm, the overall system resolution you get is 50 lp/mm. If you use the lens having 200 lp/mm resolution, with the same film, your system resolution will improve to 67 lp/mm.
Lens Resolution The laws of physics impose maximum resolution on the image formed by the lens. This is a theoretical limit due to diffraction of light. As such, this is the absolute maximum an ideal lens can achieve. The theoretical resolution is dependent on the lens aperture used as well as wavelength of the light, as shown below.
1 where W is the wavelength (in mm) and Feff is the effective f-stop. (In high magnification photomacrography, the exposure factor often pushes the effective f-stop higher than the f-stop marked on the lens, but in normal shooting situations, the effective f-stop is the same as the f-stop shown on the lens.) The wavelength of light the human eyes can perceive lies around 0.0004 - 0.0007mm range from blue to red in the spectrum of visible light. Using the mid-point of 0.00055mm (monochromatic green), the resolution equation is reduced to :
1500 The resolution values thus derived are shown in Table I for various f-stops. Again, this is the maximum resolution any lens can possibly achieve.
Table
I * f-stops below f45 may be only meaningful in photomacrography Film Resolution The film resolution is often described for two situations: One is for the test subject having a contrast of 1000:1, and the other of 1.6:1. The first 1000:1 contrast represents a high contrast situation in the testing laboratory, and the 1.6:1 is the average contrast of real-world subjects around us. Expectedly, the film performs much better for the 1000:1 contrast condition than in the real world. Note that the 1000:1 contrast is only achievable in a back-lit projection setup of the test pattern. Even a black and white test chart well lit by a 45 degree illumination only achieves a fraction of this contrast. Therefore, a resolution value measured at 1000:1 contrast is for comparison purposes only among different films, and is meaningless when applied to a real world situation. Here are some examples of film resolution. Generally, a B&W film yields better resolution than color. A color transparency (slide) film typically scores much better than a color print (negative) film. Also, a slower film (lower ISO rating) tends to be superior than a faster film in resolving power. Some
numbers
*Diffusive RMS granularity value Film Is Limiting Typically, the resolution of the film available in the consumer market today is much lower than the lens resolution. This often makes the film the ultimate bottleneck of the photographic process in the overall resolution equation. This explains why an expensive lens from the camera manufacturer does not drastically improve the picture quality of your family picnic when viewed side-by-side against the picture taken by a much less expensive lens. A chart below shows the overall resolution (system resolution) for various combinations of lens and film resolutions. If you use a typical color print film of 50 lp/mm resolution, your final resolution is 43 lp/mm with a 300 lp/mm lens. If you spend a top dollar to invest in a top quality lens of 600 lp/mm resolution, your combined resolution improves to 46 lp/mm, a mere 7 % increase. Using the same 300 lp/mm lens, on the other hand, if you change your film from 50 lp/mm to 80 lp/mm, your final resolution jumps to 63 lp/mm - near 50 % improvement! As stated previously, the lens resolution of 100 lp/mm and the film resolution of also 100 lp/mm will only yield the system resolution of 50 lp/mm for the final image formed on the film, as seen in the chart below.
In the world of digital photography, chemical film is replaced by a digital sensor. If you have a 24 MP (mega-pixel) digital camera with a full-frame sensor (24 x 36mm), the film resolution of this camera is calculated to be around 83 lp/mm. In the days of chemical film, this is the same resolution given by Fujichrome Velvia. That is to say, only when we have reached a 24 MP full-frame digital photography can we confidentially state that our digital sensor technology has finally arrived at the same level as the good-old Velvia in terms of film resolution. Moving forward, a 48 MP full-frame sensor gives you about 118 lp/mm film resolution. As mentioned earlier, a typical lens resolution hovers in the 300-600 lp/mm range. This means there is a tremendous room for the sensor resolution to catch up with the current lens resolution. Just to give you a headsup, a full-frame sensor of 1000 MP will give you around 500 lp/mm film resolution, compatible with today's lens resolution. ,
Other Factors Affecting Image
Sharpness (1) CAMERA SHAKE / BLUR Even a slightest camera movement during the exposure can easily wipe out any benefit of a good lens and a high-res sensor.... . Use a fast shutter speed to alleviate the problem. A traditional rule of thumb is to use the shutter speed faster than 1/focal length (mm) of the lens you are using (in 35mm photograph). But the kind of shake we are concerned about in the context of high-resolution digital sensors (like 40 PM and above) is so slight that this traditional one-over-focal-length shutter speed may not be fast enough. , Today's image stabilization technology is very reliable, powerful and effective.
Using a tripod is
always a good idea.
Although cumbersome to use and time-consuming to set up (not to
mention having to
carry the darn thing along the way) the tripod does make a
difference in the image quality. A tripod comes in different
sizes and weight. The sturdier the better, of course, but
likely the heavier. The tripod is important because the
slightest camera movement might wipe out the image quality
difference of the expensive lens that you paid
additional $1000 for. (2) FOCUS ACCURACY Even a slightest error in focusing can easily wipe out any benefit of a good lens and a high-res sensor, so focus carefully... Using a tripod may help you focus better. Today's autofocus (AF) is a very reliable technology, especially in moving situations. Cross-hair / phased Ensure your AF is well-tuned.... The focus changes as you stop down the aperture. This is a bad lens. If the lens exhibits this tendency, the only remedy is to re-focus at the aperture you intend to use. The only time I consistently do this is when I do high magnification photomacrography. I use Zuiko Macro 20mm F3.5 lens (Olympus) and Minolta Macro 12.5mm F2 lens, both specifically designed for use with a bellows extension. Since the focus tends to move as I stop down, I always set the aperture to f5.6 - f8 (no auto aperture for these lenses) and then focus very, very carefully before firing. There may be a mechanical misalignment in the system that is beyond your control (including the film flatness in film camera). The SLR camera mirror may be misaligned. If the mirror does not return to the precise mid-point (at 45 degree angle) between the film and the focusing screen, however carefully you focus (manual or auto), the film is not getting the focused image. Focusing the image on the sensor itself (as in mirrorless cameras or using the live view in the SLR cameras) will eliminate this possibility.... Film flatness. This is more of a problem for the film format larger than 35mm. Digital photography does not have this issue... (3) LENS APERTURE Any lens has various aberrations that reduce the resolution. Since some aberration can be lessened as you close down the f-stops, there is some optimal aperture (a sweet spot). Many lenses tend to yield their highest resolution (at the image center) when used at the aperture a couple of stops down from wide open (though this could vary depending on the lens). By stopping down one or two additional stops, you may increase the overall image resolution of the entire frame area due to the improvement of the resolution at the image corners (though the image center resolution may decrease). So, there is such a thing as the "best" aperture for a given lens. This is the aperture you should use if the resolution is the only thing you are after -- I decide on which aperture to use, first and foremost, to control the depth of field; the resolution consideration is often secondary. Also, as regard to the f-stops, we have already discussed the theoretical resolution limit due to diffraction of light. (4) INCOMING LIGHT / FLARE / GHOSTS Use the lens hood. This is very important especially in outdoor photography. You should always try to avoid the sun from hitting the lens. Even with today's advanced lens coating technology, there is often a visible image quality deterioration if a strong light hits the lens (due to internal reflection of the strayed light). A so-called "ghost image" is one manifestation. "Flare" over a large area of the frame is another undesirable degradation of image. I often carry a piece of black cardboard to use as a lens shade (if my hand is not good enough) in order to avoid the sun, especially for a wide-angle lens, because the attached lens hood is often not enough. The only time I allow the sun to hit my lens is when I am intentionally including the sun in my photograph.
What Eyes Can See One line pair comprises one white line and one black line. So, 4 lp/mm is equivalent to 8 dots/mm. This is what the unaided eye can discern on the print. The table below shows how many dots are needed on the photographic print to look sharp to the eye based on this unaided eye's maximum resolving capability. These dots, of course, must ultimately come from the image captured on the film (chemical or digital). Print Size (inches) Short-side (mm) Total Pixel Number Needed on the Film (chemical/digital) *
3 x
5 75 mm x 0.5 M pixels * Total pixel number is computed as (S x 8) x (S x 1.5 x 8) where S is the short side length of the print (expressed in mm). The longer side of the print is assumed to be 1.5 time the shorter side. If the print's aspect ratio is closer to square than 1:1.5 as in film format, it simply means the print is not taking the full advantage of the film real estate, and some pixels are thrown away. Still, for the purpose of pixel number calculation on the film, it is appropriate to use 1.5 aspect ratio.
Table - How many pixels are minimally needed on the image in order to produce a print of various DPIs - provided no pixels are lost during the printing (from the image to print). Print DPI (dots-per-inch) 100 200 300 400 500 600 700 800 Print Size (inch)
3 x 5
300x500 600x1000
5 x 7
500x700 1000x1400 8 x 10 10 x 14 16 x 20 20 x 30 30 x 45 40 x 60
Viewing distance, to see the whole picture - not scanning Necessary print resolution Max print size from various format film, resolution at the film
Modulation
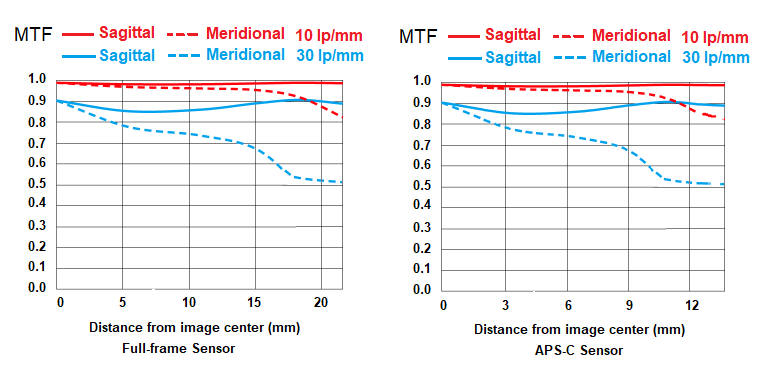
Transfer Function (MTF) MTF is useful to describe the quality of the lens accurately. Unfortunately, not all manufacturers provide MTF data for their lenses. Unlike resolution testing, MTF data are not readily derived outside of testing laboratories. To truly describe a given lens, many MTF graphs are needed, depending on lens apertures, spatial frequencies, and the light used. It is even possible to measure MTF for differing subject distances. Such is the case, MTF data from different sources cannot be directly compared without noting the conditions under which MTF data are derived. How To Read MTF To help interprete the MTF data, sample MTF graphs are given below for a fictitious 50mm f2.8 lens for 35mm format camera. The upper graph shows MTF data at lens wide open at f2.8. The lower graph shows MTF data for the same lens at f8. Each graph shows MTF curves for three different spatial frequencies: 10 lp/mm, 20 lp/mm, and 40 lp/mm. For each spatial frequency, a pair of MTF curves is given, one for the sagittal target lines (green) and one for the tangential target lines (red). Contrast always drops off as the spatial frequency increases. Recall from the discussion of theoretical maximum resolution that the f-stop limits the maximum resolution. For a given f-stop, contrast drops to zero at that spatial frequency. Of three pairs of curves on each graph, the MTF values for the lower spatial frequency (10 lp/mm in this example) are indicative of the overall contrast of the lens. The higher the curve throughout the distance range to the corner of the image (toward right in the graph), the better contrast the lens exhibits. The MTF values for the higher spatial frequency (40 lp/mm here) are more indicative of the resolution of the lens. Comparing the two MTF graphs below, both contrast and resolution are seen to move up as the lens aperture was stopped down to f8. General improvements toward the image corner are also seen.
Nikon site provides MTF data for various lenses at the end of each page.
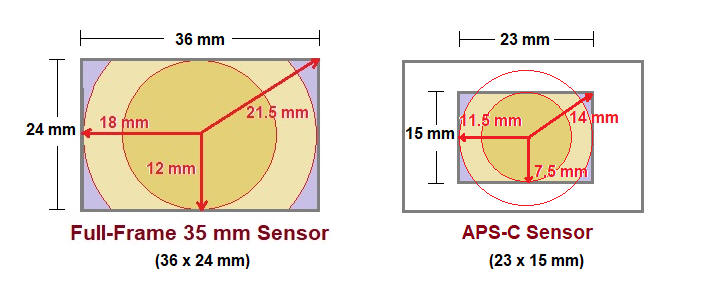
DIFFERENCE DUE TO SENSOR SIZE Given the same MP resolution (say, 20 MP), the larger sensor gives the better final result. That is, a full-frame sensor is better than the APS-C format if both have the same 20 MP. Well, the question is how much better... 1) The higher the MP, the more pronounced the difference becomes. For instance, at 10 MP, the full-frame is better than the APS-C format only by 5-15%. But at 500 MP, the full-frame is twice as good (100% improvement). Recall, some 15 years ago, that Nikon -- to many people's surprise -- kept the APS-C format for their flagship D2 camera (around 10 MP), exactly for this reason. 2) The difference is bigger for the lenses with lower resolution (100 lp/mm) than the lenses with higher resolution (600 lp/mm). If the lens resolution were "infinite", there would be no difference in the final picture quality (resolution) between the 20 MP full-frame camera and the 20 MP APS-C format camera. Of course, that is an impossibility in physics. But in reality, better lenses will make the sensor size difference less important.
PICTURE SHARPNESS We are on the subject of picture sharpness: How sharp the picture looks, on print, for instance. Resolution vs. Contrast Resolution is one aspect of sharpness. In other words, resolution alone does not determine the picture sharpness; we must consider contract also. You may have a lens with good resolution but poor contract, and the result is a poor photograph. The resolution and contrast must go hand-in-hand. That said, we are assuming a lens with a reasonable contrast here, so, for the purpose of our discussion below (for simplicity), resolution is a main, determining factor for sharpness. Final Resolution The final picture sharpness is an accumulated result of many factors involved in the complex sequence of photographic process. But among them, the two main factors are: the lens resolution and the film resolution (digital sensor MP in the digital world). Film vs. Lens Typically, the film is limiting (the bottle neck), since the lens resolution is around 300-600 lp/mm and the current film (sensor) resolution is nowhere near that level. So our discussion below focuses on the digital sensor resolution. Loss of Sharpness Once you get your camera and lens, you must know how to use your gear. The sharpness of your photograph is deteriorated mainly by two factors: camera blur and poor focus. A tiny amount of camera blur and/or focusing error will easily wipe out the resolution advantage of a high MP (mega pixel) camera and a professional quality lens that you paid an extra five grand for. Use blur to include focus error for simplicity.... Blur Detection Sensitivity The way to think of a high MP camera is this: The higher the MP of your camera, the more sensitive it is to detect a small blur in the picture. A 40 MP camera will detect a small blur in the picture a 20 MP camera cannot detect. You do that by viewing the picture 100% pix-to-pix on the monitor. Probably the movement of the image half the amount of pix-to-pix distance can be detected at 100% viewing. But that's not a normal way of appreciating a picture. Real Print So, let us make a print to truly appreciate and enjoy the picture. For this print test, we are using a picture that does not have any blur or poor focus (based on 100% viewing test) here. If you keep making a larger and larger print, you eventually come to a point (print size) where the picture is no longer sharp. This is the print size-limit of this MP camera. If another picture you took with the same gear is not as sharp at this same print size, it is due to camera blur and/or poor focus that you introduced - you must improve the way you shoot. What Went Wrong
Blur:
Focus: If the print is smaller than the limit of that MP, the print may look sharp even with some blur. What that means is that at that print size, the amount of blur that exits is not detectable. Summary
- Decide the print size you
need
PRINT SIZE
1
2
3
4
5
6 20 MP (DX) --- ----- -limit- ---------- ------------ --------------- 20 MP (FX) --- ----- ------- --limit-- ------------ --------------- 40 MP (FX) --- ----- ------- ---------- ------------ -----limit----
Shutter speed
1/60 1/125
1/250
1/500
1/1000
1/2000 For a given MP camera (and the lens) you use, there is a conceptual maximum print size you can produce without losing sharpness. This is the print size limit of your particular gear. But to achieve this limit, you must exercise a certain degree of care when shooting your photograph. As mentioned earlier, there are two major causes that can reduce the picture sharpness: camera blur and poor focus. For the purpose of discussion below, we talk about the camera blur, and use the shutter speed "as an example" of a care that you can exercise to control the mount of blur when shooting. The bigger the print you desire (within the limit of your photographic gear), the more care you must exercise to achieve the goal (in our example, a faster shutter speed to prevent the blur).
This shows the resolution, as expressed in line pairs per millimeter (lp/mm), for three sensor size formats (full-frame, APS-C, and four-thirds) for a range of given camera MP (mega-pixel), from 2 MP to 64000 MP.
Total number of dots
in final print for APS-C (DX) and full-frame (FX) sensor for
various MP cameras
TOTAL NUMBER OF DOTS IN YOUR PHOTOS
The following shows the total number of dots (based on the
system resolution) on your photograph for various
|


| Carnivorous Plants Photography Web Site: Copyright © 2001-2018 Makoto Honda. All Rights Reserved. |